Friday 20 May 2011

Poll result 2: Favourite spectator sport

Our blog readers have had their say and it turns out RUGBY is the most popular spectator sport. And the majority of the SSZone team would agree (barring one or two ;-P). 
I suppose not much studying is going to get done amongst you considering the current Super Rugby season is followed by the Tri-Nations and then the Rugby World Cup in New Zealand. =)

Thursday 19 May 2011

Football: Shoot from the hip

THE LEG PRESS
Starting position
Assume the seated position so that your back is flat against the back support when your knees are bent at the angle needed. This should be at 90 degrees between the hip and the knee. After the seat is adjusted for this positioning, place both feet flat on the foot platform about waist-width apart. Grasp the handgrips with a light grip to avoid build up of pressure during movement.
Joint movement: flexion of the hip and knee joint, dorsiflexion of ankle joint. 
Execution

Inhale slightly when ready to start and hold your breath as you extend the legs and push the foot platform away from you using the heels of your feet (with slight support from the balls of the feet). Push the foot platforms away until the legs are fully extended but not locked.
Joint movement: Extension of the hip and knee joint, plantarflexion of ankle joint.
Recovery
Hold position after reaching the end position, exhale and relax the muscles slightly to slowly control the movement back to the original position (90-degree angle in the knee joint). You must keep the movement under control – do not bounce the weight stack. Maintain a neutral neck position and pelvic-spinal positioning throughout the movement. The entire movement should be one smooth, fluid motion.
Joint movement: Flexion of the hip and knee joint, dorsiflexion of ankle joint.

THE HIP JOINT
The Acetabulofemoral joint (hip joint) is the articulation of the femur and acetabulum of the pelvic girdle. It is a synovial joint whereby the round head of the femur fits into the cup-like depression in the pelvis (acetabulum). Hence it is a ball-and-socket joint. This joint is tri-axial but for the purpose of the leg press, only extension and flexion occur.
Three main ligaments reinforce the hip joint.
The Iliofemoral ligament attaches anteriorly from the inferior iliac spine of the ilium to the lower part of the intertrochanteric line of the femur. The fibres of the ligaments spiral medially as they run down, so preventing hyperextension of the joint.
The pubofemoral ligament arises from the pubic portion of the acetabular rim, and runs partly below the joint.
The ischiofemoral ligament consists of a band of strong fibres on the posterior side of the hip joint. It spans from the posterior of the acetabulum and attaches at the intertrochanteric line of the femur.
Hip Flexion
Flexion of the hip is primarily due to the contraction of the Iliopsoas muscle, which comprises of the iliacus and psoas components.  The Iliacus originates on the pelvic crest and attaches on the femur. The Psoas major, the longer of the two muscles, originates on the lumbar vertebrae and attaches to the femur. The agonists are the Rectus femoris, Pectineus and Sartorius. The antagonist is the hamstring, which lengthens during the contraction of the iliopsoas. The Gluteus Maximus and Adductor Magnus act as synergists. The hamstring also serves as a stabiliser during the hip flexion.
Hip Extension
The primary mover during hip extension is the Gluteus Maximus. The hamstring muscles, Biceps femoris, Semitendinosus and Semimembranus also contribute to hip extension (agonist). The Quadricep acts as the antagonist.
In future posts we will look at the knee joint and ankle joint in more detail. To end off here's a funny video clip about leg pressing from a tv commercial in the US - enjoy. =)


Sources:

Leg Press
http://www.exrx.net/WeightExercises/Quadriceps/SL45LegPress.html
Functional Anatomy of the Lower Limb http://homepage.mac.com/wis/Personal/lectures/musculoskeletal/LowerLimb.pdf


YOUNG BLOOD!!!

Strength training for young rugby players
It has been an ongoing debate, whether or not it is advisable to allow young rugby players, or athletes for that matter, to engage in strength or resistance training.
Firstly, lets get through all the myths and misconceptions that you have been fed up until now. There is no factually reported, evidence based research that suggest’s that youth resistance training has negative effects on adolescents. Ok, lets breakdown that last statement, to ensure you literally understand what I mean by youth or adolescent resistance training. Firstly adolescents are those individuals who have undergone the process of puberty, and exhibit the physical characteristics of maturation specific to their genders. That simply implies that they start developing secondary sex characteristics.


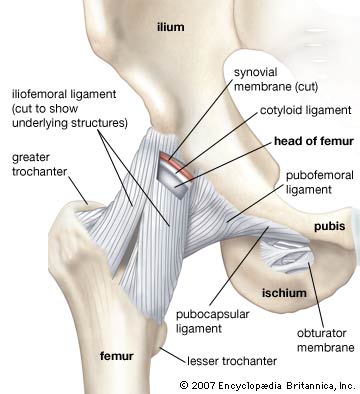
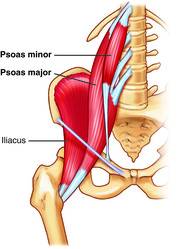
However heavy resistance training in prepubescent kids, could possibly prove harmful to them. This is viewed in the light that younger kids will not be able to cope with the intensity and volume of training typically exhibited in adult programs. Important to understand that this does not mean that young kids cannot “strength train”, as this understanding encompasses other avenues of muscular fitness, such as increasing their muscular endurance and resiliency through bodyweight exercises. This might not yield major increases in their benchpress or squat 1RM, but it will have a considerable effect on their underlying soft tissue structure (muscle, tendon and ligaments), as well as increased bone mineral density. This obviously has one obvious offshoot: increased strength = decreased risk of injury, due to a greater resielency to penetrating forces, especially those experienced in the game of rugby.
The greatest incidences of injury during any child focused activity, has been through poor instruction, lack of supervision, as well as poor program design (Jones et al Phys Sports Med 28 2000).
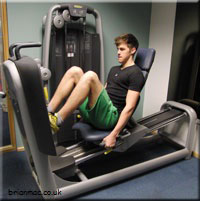
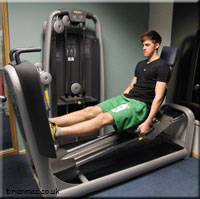
Rugby is a game which involves high speed collisions, quick reactions, awkward bodily placements and long periods in which the muscular system is under strain, therefore it is only logical that one engages a strength training program to offset the chance of getting injured. When dealing with younger rugby players, don’t disregard this element of strength training because of unfounded myths, and rather focus on the guidelines of program design to ensure your future Boks are well prepared in the early years to ensure that their full potential is one day reached.
The process of strength training at a young age is not that difficult at all, but just keep in mind that the child, adolescent and adult, function and conceptualise activities in completely different ways. Thus what might seem appropriate for an adolescent might not be for a child, in terms of its instruction, its complexity and obvious overall physical effect.
Ok, so we now know why all ages can engage in strength training, and since we want to see how it can relate to rugby performance in the early and late phases of childhood, what exactly are the parameters we need to ensure are maintained when strength training young rugby stars.
For the most part, schoolboy rugby players, and most notably development players, are only exposed to proper strength training instruction at the pre-elite stage, when talent identification programmes, and scouts essentially want to sign them up into their fraternities, with the prospects of future fame. This is all well and good, but it initiates a devastating process of fast tracking younger players into the big leagues, without an indepth look into either their training or playing history. It is often that we hear of sub 20yr players, been drafted into the ranks of super rugby, and only recently has the various South African unions, taken heed to exercise scientists calls to ensure athletic preparation in the younger years to promote career longevity and success. With this said there has been a number of initiatives aimed at preventing injury at the youth level, through programmes such as Bok Smart, which aims to educate coaches at all levels, of the importance of conditioning for the prevention of injury.
So what guidelines am I talking about? For one, it is important to note that the phase of greatest trainability in youth athletes is 14-18 months after their growth spurt, which is roughly around 14yrs for boys. However you must ensure that individual differences are accounted, and instead base their readiness for foundational resistance training with weights on their biological age (when they start maturing physically)
The accompanying table outlines the guidelines for strength training, through the phases of physical maturation, for rugby players
Age
Mode of training
Length of training
Specific focus elements
progressions
Equipment
Reasons/concerns
<12
General preparation/ non specific motor development, muscular endurance
Non specific but 2-3 days a week of activities that strengthen all major muscle groups
Bodyweight exercises, fun yet challenging games that involve gross muscular movements, eg, gymnastics
Low grade resistance training and technique development
Medicine balls, climbing walls, light dumbbells, climbing ropes etc
Hormonal and musculoskeletal system not ready for complex or high intensity training
13-15
Strength training introduction
Low volume, and lasting about 12-18months
Technique development, circuits to build work capacity, core strength and ligament strength develepmont
If biologically mature may begin some hypertrophy (muscle development training)
Dumbbells, barbells, medicine balls, strength machines for technique and R.O.M
Increased bone density improved through strength modalities, aided by spike in testosterone levels
16>
Training broken up into specific phases – general strength (GS), specific strength (SS) and competitive preparation (CP)
GS – 4x wk

SS – 3-4x/wk

CP – 2-3x/wk

GS and CP in the initial 1-2yrs and then intro of CP when ready
General anatomic adaptation and hypertrophy and
Transition to max strength, power and plyometrics, match specific strength
Barbells, dumbbells, medicine balls, and later Olympic bars, strongman equipment, kettlebells
Intro into the pre-elite phase. Increasing levels to invoke performance gains alongside prehabilitation techniques

As we can see from the table, the progressional guidelines are fairly precise, and will induce an overall training response in athletic ability from childhood, through their rugby and positional specific training prowess that will ultimately succeed the phases mentioned in the table.
As a last note remember kids enjoy movement not precision, adolescents are impressionable and at a precarious age where they are either made or broken in terms of vital physical preparation, and lastly this preparation can later be honed into a well oiled and physically significant player in the latter years. So the take home message is ensure timed progression and understand that Rome wasn’t built in a day, and neither will your physical prowess as an athlete, without major flaws and cracks that will start to show, through a lack of proper training.
Author:
N. Orson (bachelor of Sport Science)
References:
Essentials of Strength Training and Conditioning, Baechle & Earle, 2008
ACSM Guidelines to Exercise testing and Prescription
Strength Training for young Athletes, Fleck & Kraemer

Cricket: Put your shoulder into it

The scapula plays several roles in facilitating optimal shoulder function when scapula anatomy and biomechanics interact to produce efficient movement.
When weakness or dysfunction is present in the scapular muscles, normal scapula positioning and mechanics may become altered. When the scapula fails to perform its stabilization role, shoulder function is inefficient, which can result not only in decreased neuromuscular performance but also may expose the individual to shoulder injury.
Common to fast bowlers in cricket is an overuse injury. This is due to the repetitive over-head activity that the shoulder joint (glenohumeral joint) performs during a bowler’s action.
During all movements of the glenohumeral joint (especially movements involving more than 90° of flexion or abduction), it is important that the scapula-stabilizing muscles be strong enough to properly position the scapula.
Thus, the role of the scapula in upper extremity function must be considered in any shoulder trainin program.
While maintaining dynamic stability, the scapula muscles must at the same time provide controlled mobility. The scapula must also rotate upward with overhead activities to clear the acromion from the rotator cuff. Upward rotation and elevation are required in order to tilt the acromion upward, hence decreasing the likelihood of impingement and coracohumeral arch compression.

The second role the scapula plays is as a base for muscle attachment. The muscles that stabilize the scapula attach to the medial border of the scapula, thereby controlling its position. In addition to acting as scapula stabilizers, muscles that attach along the lateral border of the scapula perform gross motor activities of the glenohumeral joint.

The third role of the scapula is best represented as the link in the proximal-to-distal transfer of energy that allows for the most appropriate shoulder positioning for optimal function. These actions can be accomplished most effectively through the stable and controlled platform of the scapula, so that the entire arm rotates as a unit around the stable base provided by the scapulothoracic and the glenohumeral joints.
Most of the abnormal biomechanics and overuse injuries that occur about the shoulder girdle can be traced to alterations in the function of the scapula-stabilizing muscles.
Developing the Perfect Bowling Action
The evaluation of scapula function is critical to overall success in managing injuries of the shoulder girdle and upper extremity. Several different methods evaluate scapula function. The first step in the evaluation process is to observe the scapula, both statically and dynamically, in relation to its role in the entire kinetic chain.

The shoulder must be considered a kinetic chain made up of several joints. The normal function of the scapula and surrounding muscles is vital to the overall normal function of the shoulder. An effective exercise regime for rehabilitation, as covered in an earlier blog, should include improving the strength and function of the muscles that control the position of the scapula. Weakness of these anchoring muscles may lead to altered biomechanics of the glenohumeral joint, with resultant excessive stress imparted to the rotator cuff and anterior capsule.
Source
VOIGHT, M.L. (2000) The Role of the Scapula in the Rehabilitation of Shoulder Injuries
Journal of Athletic Training, 35(3): 364–372

Football: Running before you're walking

Following a running programme is a great way to improve your aerobic ability for football. A 10km run uses a great amount of aerobic energy, a key aspect of the energy demands in football as mentioned in an earlier blog. It is also roughly the distance an elite football player can expect to cover during a game. But with the need for variations in pace and intermittent bouts of sprinting, a combination of strength and endurance are very important too.
For these reasons, the primary focus of any running programme should be boosting anaerobic threshold, improving aerobic endurance, and developing strength to minimise fatigue during the event. The anaerobic system will also be trained- through the use of Intervals (VO2 max). This all serves to improve Lactate threshold allowing you perform at a higher intensity for a longer period of time.

TRAINING TO COVER 10KM – BEING ‘MATCH FIT’
The three key sessions that will be used to prepare for the 10km are a Tempo run, Fartlek training, and Intervals.

Tempo Run
This session should be completed once weekly, and is aimed at improving aerobic endurance, strength and fatigue resistance. This run should ideally be completed at a high intensity for the duration of the run (best pacing).

Fartlek training
This weekly intensity session has two components to it. The speed portion of the session is conducted as a series of high-speed efforts ranging from 400m in length. These efforts are aimed at improving your maximal speed and running economy. This improved running economy will filter down to slower speeds as well. Each speed repetition is conducted in a fresh state, to allow holding good posture, and achieving high speeds. Focus on being fast, tall and in control of your technique. This will then hopefully translate into a good running technique whilst in possession of the ball as well.

The second part of the session is conducted after 4-5 minutes of easy running to allow recovery from the speed repetitions. These VO2 intervals are slightly longer, ranging in distance from 600-1000m in length. The aim is to boost your VO2max., sustainable running speed and increase your understanding of pacing. Between each effort a short recovery of between 90 seconds and 2 minutes is had, thus only partial recovery is allowed. These sessions will be completed on the track initially but can then be progressed onto the playing field itself.
 

Intervals
This is slightly longer intervals done at a speed a little slower than fartlek. The aim is to improve anaerobic threshold, strength and running economy. These should not be done too hard, as this negates the purpose of the session - by doing 4-7 minute intervals the session becomes quite stressful. High Intensity Interval Training (HIIT) is another aspect of Interval training but should not be performed with fartlek training to prevent fatigue.


Recovery run
Supplement sessions with some lower intensity recovery runs. These runs can be completed 1-2 times weekly and should consist of 40-60 minutes of easy running. They should not be stressful at all, and in most cases you should finish the run feeling better than you did at the start.


Warm-up and Cool down
All sessions should begin with a 10 minute warm-up. This will be made up of 6 minutes of easy jogging followed by some dynamic lower body stretches. Inclusion of agility drills such as high knees and butt kicks are also good for the speed sessions. It is also essential to complete an 8-10 minute cool down at the end of each session. This will serve to enhance recovery. In the programme details below, the duration of the weekly long run includes 10 minutes of warm-up and 10 minutes of cool down for each stated running time.

Source:
Baechle T.R; Earle R.W. (2008). Essentials of Strength Training and Conditioning (3rd ed.) Human Kinetics


We


Sport Specific Training Program - Hockey

Just like any sports specific training program, a hockey training program must meet the demands of the sport.  Hockey is a multi sprint sport and is very physically challenging.  A hockey player requires endurance, strength, power, skill, agility and speed to compete competitively.
As explained in my first blog ’’ENERGY DEMANDS of HOCKEY’’ – I explained that because of the nature of the game, it places a high demand on mostly the aerobic system.  It is thus evident that good aerobic endurance is required, BUT not only on aerobic.   Aerobic and Anaerobic endurance should be high in elite hockey players. 

From experience I can say that majority of the game is spent in low-level activity and repeated sprints, which speed and the tolerance of lactic acid a very important aspect for players and should be utilized in training programs.

Strength is also a central aspect to consider in hockey players - power is required for speed, quickness and agility.  Upper body strength will allow players to pass at a higher speed over longer distances and shoot with more power.  It is evident that strength endurance is just as crucial as explosive power in hockey.  Both should be effectively developed without causing fatigue and eventually over- training.  The synthetic astro turfs that the game is played on places extra strain on the body compared to natural grass and a good conditioning program plays a crucial role in the prevention of injuries.  Out of personal experience I can say that practicing on astro and doing conditioning on grass is a good combination, as it reduces the injury risk of playing only on astro turfs.

Training Articles for Hockey players (explanations of WHY? and HOW? to do specific training techniques):

Dynamic Stretching prior to training and games have become very popular as it helps to get the body ready for demands that are about to be placed on it, i.e. running, sprinting, change of direction etc.
Stretching after exercise or a game is very important in recovery and injury prevention.

Fartlek, Tempo Training and Interval Training.
More on each type of these endurance training and also examples of each.

The intermittent nature of hockey makes steady state running a poor form of endurance training as it does not replicate the sport.

Strength training must be sport specific or you will not reap the benefits thereof.

Step by Step directions to develop a sport specific training program.

Yes power is needed in hockey…as mentioned above it will have specific benefits to the sport.

Plyometrics will increase both speed and power in hockey players.

Hockey requires a combination of strength, power and muscular endurance for optimal performance.

Speed, Agility and Quickness plays an integrated part in performance of all hockey players.

Increased Flexibility will decrease chances of injury occurrence.

A Sample Off Season Strength Training Program
OFF Season does not mean doing nothing and is just as vital as IN season training as it helps to maintain previous fitness, strength, speed, agility, quickness - levels obtained

Hope this gives you an idea of the combination of various training techniques that is needed for optimal performance in Hockey.  In due time each of the above can be covered more in depth depending on what YOU are interested in…

BLOG BY:  ELZANNE JACOBS

Sources:


Boyle PM, Mahoney CA, Wallace WF. The competitive demands of elite male field hockey. J Sports Med Phys Fitness. 1994 Sep;34(3):235-41
Reilly T, Borrie A. Physiology applied to field hockey. Sports Med. 1992 Jul;14(1):10-26
Spencer M, Lawrence S, Rechichi C, Bishop D, Dawson B, Goodman C. Time-motion analysis of elite field hockey, with special reference to repeated-sprint activity. J Sports Sci. 2004 Sep;22(9):843-50.

The “Art” of Sprinting (Part 1 – The Technique)


Sprinting is very much an art form and requires a tremendous amount of training to perfect. Obviously natural talent and speed are essential to making any great sprinter, however, a good sprinting technique is also crucial in shaving off those one hundreds of a second off your time.

Lets cover some of the basics of the sprinting technique:

Arm Drive – Your arms should be kept relaxed and at 90 degrees of flexion. your arms should swing from the shoulder and should brush your cheek on the way up and your pocket on the way down and you should focus on swinging them in a straight line as to maximize your forward momentum. Remember, the harder you work with your arms, the more force your legs will be able to produce and the faster you will run, but always keep it controlled but relaxed.

Body Posture – keep your body straight and lean slightly forward, do not bend at the waist as this will adversely affect your centre of gravity and will destroy your technique. Your entire body from head to toe should be straight and leaning slightly forward, try keep your head and trunk still and stay relaxed.

Ground Contact – stay light and on the balls of your feet, not on your toes. this offers stability and quick feet.

Stride Length – getting the stride length correct is rather tricky. You don't want to over- or under stride as this will compromise your sprint performance. When you over stride your foot makes contact with the ground in front of your centre of gravity and slows you down and when you under stride your small steps mean that you don’t cover as much ground. So getting the length and frequency correct takes some practice and some experimentation.

Here are some drills to help improve your sprint technique. note that these drills should be performed after a warm up or or on a rest day. these drills are not designed to fatigue you, they are simply to improve technique. Make sure you are fresh when you perform these drills – Quality above all else.

Sprint Drills:

high knees – jog 10m and then with an increased intensity raise knees to about waist height for 10m making use of good arm mechanics, jog 10m and the sprint 10m and then rest.

high knees on the spot: jog 10m, stop and perform high knee action with focus on arm action, move forward with this action focusing on the number of foot contacts rather than how fast you cover the 10m.

butt kicks - sprinting over 10 meters concentrate on flicking your heels up to touch your butt while making use of good arm mechanics.

leg speed: sprint a 50 – 60m distance focusing on your legs above all else. try different stride lengths to see which length offers the most speed.

arm drive: sprint for 40m focusing on driving your arms in a straight line. Keep your elbows flexed at right angles while keeping your arms and shoulders relaxed.

Below is a photo sequence of the sprinting technique:

sprint1sprint2sprint3sprint4sprint5sprint6sprint7sprint8sprint9sprint10sprint11sprint12sprint13sprint14

Till next time – happy sprinting!


References:

photo sequence courtesy of www.brianmac.co.uk/sprints/sprintseq.htm

Sprinting Techniques By Latif Thomas - www.athletesacceleration.com.

Blog by: Armant Goldswain